In the previous post, we explored how CNI assigns IPs to Pods and enables inter-node communication. veth pairs, bridges, VXLAN encapsulation — ultimately, it was all about combining OS network primitives to create the illusion of a “flat L3 network.”
In this post, we dig into what else needs to be layered on top of that network so hundreds of services can communicate safely, observably, and declaratively. From how Istio transparently intercepts traffic with iptables, to how it pushes configuration to Envoy via xDS, to how it implements Zero Trust with mTLS — we’ll trace the inner workings of a service mesh from the kernel level up.

Related posts in the networking series:
- Linux Network Internals: From Interfaces to iptables
- The Essence of Kubernetes Networking: CNI, VXLAN, and How Pods Communicate
Overall Architecture: Control Plane + Data Plane
Istio is an open-source service mesh that provides traffic management, security (mTLS), and observability for inter-service communication on Kubernetes. The key point is that all of this can be applied transparently without modifying any application code.
From a networking perspective, Istio can be broken down into two major components.
Control Plane (istiod)
The central manager. A single component that consolidates Pilot, Citadel, and Galley, responsible for pushing configuration to the Envoy proxies. It watches the Kubernetes API for changes to resources like Service, Endpoint, and VirtualService, converts them into xDS (discovery service) configurations that Envoy understands, and pushes them to each sidecar.
Data Plane (Envoy proxies)
Where the actual traffic flows. Envoy, injected as a sidecar into every Pod, intercepts and processes all traffic.

To elaborate on the diagram above: when an App Container starts in a Pod, a sidecar container called istio-proxy starts alongside it. Since istio-proxy internally runs an Envoy proxy with added bootstrap and certificate management logic, “Envoy” and “istio-proxy” essentially refer to the same thing.
When Pod A sends a request to Pod B, the app doesn’t communicate with Pod B directly. The Linux kernel’s netfilter intercepts the traffic through iptables rules and redirects it to istio-proxy. Specifically, outbound traffic is caught at the OUTPUT hook and inbound traffic at the PREROUTING hook, each REDIRECTed to Envoy’s listening ports (15001 and 15006). The result: the apps think they’re talking to each other directly, but in reality, the istio-proxies on both sides are doing the communicating.
During this process, the istio-proxies establish an mTLS (Mutual TLS) encrypted channel between them. Unlike regular TLS where only the server presents a certificate, mTLS requires the client to present one too — both sides cryptographically verify each other’s identity. And all these network settings — routing rules, certificates, security policies — are delivered in real-time by istiod at the top via gRPC streams through a protocol called xDS.
Sidecar Injection Mechanism: Mutating Admission Webhook
Kubernetes API Server Request Processing Pipeline
When you create a Pod with kubectl apply, the request goes through several stages after reaching the API Server but before being persisted:
kubectl apply (Pod creation request)
       │
       ▼
  Authentication (Who are you?)
       │
       ▼
  Authorization (Do you have permission for this?)
       │
       ▼
  Mutating Admission Webhooks  ← ★ Pod spec can be "mutated" here
       │
       ▼
  Schema Validation
       │
       ▼
  Validating Admission Webhooks  ← Can only reject, not mutate
       │
       ▼
  Stored in etcd → Pod creation proceeds
A Mutating Admission Webhook is an external HTTP endpoint that can intercept this pipeline and modify the request content. When the API Server receives a Pod creation request, it sends that request to the registered webhook server, which responds with a JSON Patch like “add these containers to this Pod spec.”

The diagram above shows the Mutating Admission Webhook in an Istio-enabled environment.
How It Works in Istio
When Istio is installed, istiod registers itself as a Mutating Admission Webhook with the API Server. It includes the condition: “only invoke me for namespaces with the istio-injection=enabled label.”
# MutatingWebhookConfiguration (simplified)
apiVersion: admissionregistration.k8s.io/v1
kind: MutatingWebhookConfiguration
metadata:
  name: istio-sidecar-injector
webhooks:
- name: sidecar-injector.istio.io
  clientConfig:
    service:
      name: istiod          # webhook server = istiod
      namespace: istio-system
      path: /inject          # requests go to this path
  namespaceSelector:
    matchLabels:
      istio-injection: enabled   # only namespaces with this label
  rules:
  - operations: ["CREATE"]
    resources: ["pods"]          # only on Pod creation
Injection Flow
- A Pod creation request comes in from a namespace labeled
istio-injection=enabled - The API Server finds a matching webhook and sends the Pod spec to istiod’s
/injectendpoint - istiod receives the Pod spec and responds with a JSON Patch adding two containers:
- istio-init (init container) — sets up iptables rules at startup
- istio-proxy (sidecar container) — the Envoy proxy itself
- The API Server applies the patch and stores the modified Pod spec in etcd
- kubelet launches the Pod according to the modified spec → the sidecar comes up alongside the app
The key takeaway: app developers don’t need to write any Envoy-related config in their Deployment YAML — the webhook injects it automatically.
Mutating Admission Webhooks aren’t unique to Istio. Plenty of services in the Kubernetes ecosystem use the same pattern:
- Vault Agent Injector — Detects the
vault.hashicorp.com/agent-inject: "true"annotation on Pod creation and injects a Vault Agent sidecar. Instead of the app fetching secrets directly, the sidecar retrieves them from Vault and mounts them as files. - Linkerd — Another service mesh like Istio but with a lighter-weight approach. Injects the linkerd-proxy sidecar via the
linkerd.io/inject: enabledannotation. - AWS App Mesh Controller — Automatically injects Envoy sidecars in EKS environments to connect to AWS App Mesh.
- Cert-manager — Uses a Mutating Webhook to automatically attach TLS certificate configurations to Pods or Ingresses.
The pattern is identical — using a specific label or annotation as a trigger to inject desired containers or configuration into the Pod spec before it’s stored in etcd.
A similar example is Prometheus, which also uses annotations (prometheus.io/scrape: "true") for configuration, but the mechanism is fundamentally different:
- Istio Mutating Webhook → Transforms the Pod spec itself. Injects the sidecar. (Push)
- Prometheus annotation → The Pod doesn’t change. It just leaves a hint saying “I’m here, come scrape me.” (Pull)
Both share the commonality of automation triggered by label/annotation metadata, but one directly modifies the Pod while the other simply reads from the outside.
The Core of Traffic Interception: iptables Redirect
The core logic of the iptables rules set up by the istio-init container:
# 1. Create ISTIO_REDIRECT chain — send all traffic to Envoy's port 15001
iptables -t nat -N ISTIO_REDIRECT
iptables -t nat -A ISTIO_REDIRECT -p tcp -j REDIRECT --to-ports 15001

# 2. ISTIO_IN_REDIRECT — inbound traffic to Envoy's port 15006
iptables -t nat -N ISTIO_IN_REDIRECT
iptables -t nat -A ISTIO_IN_REDIRECT -p tcp -j REDIRECT --to-ports 15006

# 3. OUTPUT chain — intercept outgoing traffic from the Pod
iptables -t nat -A OUTPUT -p tcp -j ISTIO_OUTPUT

# 4. PREROUTING chain — intercept incoming traffic to the Pod
iptables -t nat -A PREROUTING -p tcp -j ISTIO_INBOUND
Of netfilter’s 5 hook points, PREROUTING and OUTPUT are used. It leverages the REDIRECT target in the nat table to rewrite the destination port to the port Envoy is listening on.

Preventing Infinite Loops
Here’s a problem: Envoy is also a process sending traffic within the same Pod. If Envoy’s outbound traffic gets caught by the OUTPUT hook and REDIRECTed back to itself, you get an infinite loop.
The solution is simple. The istio-proxy container runs as UID 1337, and the iptables rules use --uid-owner 1337 to RETURN (skip interception) for outgoing traffic from that UID. In other words: “if the packet is from UID 1337 → it’s already been processed by Envoy, so let it through.”
# Don't intercept traffic sent by Envoy (UID 1337)
iptables -t nat -A ISTIO_OUTPUT -m owner --uid-owner 1337 -j RETURN
Restoring the Original Destination: SO_ORIGINAL_DST
iptables REDIRECT rewrites the packet’s destination address to 127.0.0.1:15001. So how does Envoy know where the packet was originally headed?
Linux kernel’s conntrack (connection tracking) is the answer. When conntrack performs a NAT translation, it records the original destination information internally in the kernel. Envoy uses the SO_ORIGINAL_DST socket option to query this information and recover the original destination IP and port from before the REDIRECT.
Ultimately, Istio’s traffic interception is a composition of Linux kernel network stack features: netfilter hook → iptables nat REDIRECT → conntrack’s original destination record → recovery via SO_ORIGINAL_DST.
Actual Request Flow (Pod A → Pod B)

From the app’s perspective, it feels like it sent a request directly to Pod B and received a direct response. But the reality is different — all traffic passes through the OUTPUT and PREROUTING hooks, where Envoy intercepts it before it reaches the app. Here are the detailed steps:
- App Container (Pod A) — The app calls
connect()to Pod B’s Service IP:Port - OUTPUT hook — netfilter matches the ISTIO_OUTPUT chain and REDIRECTs the destination to
127.0.0.1:15001(Envoy outbound) - Envoy Sidecar (Pod A) — Recovers the original destination via
SO_ORIGINAL_DST, makes routing decisions based on xDS configuration (load balancing, retry, timeout, etc.). Initiates an mTLS handshake using certificates issued by istiod and creates a new connection to Pod B’s actual IP - PREROUTING hook — Traffic arriving at Pod B is REDIRECTed by the ISTIO_INBOUND chain to
127.0.0.1:15006(Envoy inbound) - Envoy Sidecar (Pod B) — Performs mTLS verification, AuthorizationPolicy checks, metrics collection, then forwards to the app port via localhost
- App Container (Pod B) — The app receives the request. From its perspective, it looks like a direct connection
The key point: apps think they’re communicating directly with each other, but in reality, the Envoys on both sides are doing the talking. This architecture enables mTLS, retries, and metrics collection to work transparently without any application code changes.
What Envoy Provides
Thanks to this sidecar architecture, without any app code changes:
- Traffic management — Declaratively configure weighted routing, canary deployments, circuit breakers, retries, and timeouts via VirtualService and DestinationRule
- Security — Pod-to-Pod communication is automatically encrypted with mTLS. L7-level access control (down to HTTP path and method) via PeerAuthentication and AuthorizationPolicy
- Observability — Automatic collection of latency, success rate, and throughput for every request, exposed as Prometheus metrics, distributed tracing header propagation, access logs
Pilot, Citadel, Galley → istiod Consolidation
In early versions of Istio (before 1.4), the Control Plane consisted of three separate microservices.
Pilot — The Brain of Traffic Management
“Tells Envoy how to route traffic.”
Watches Kubernetes resources like Service and Endpoint, as well as Istio resources like VirtualService and DestinationRule, converts this information into xDS APIs (LDS, RDS, CDS, EDS) that Envoy understands, and pushes them to each sidecar via gRPC streams. Everything Envoy knows — “where should this request go?”, “how many retries?”, “what’s the timeout?” — comes from the configuration Pilot pushed down.
Citadel — Security (Certificate Management)
“The CA (Certificate Authority) that issues and renews certificates used for inter-service mTLS.”
Each Envoy sidecar requests an X.509 certificate corresponding to its service identity from Citadel at startup, and Citadel signs and delivers it. Without this certificate, the Envoys on Pod A and Pod B can’t perform an mTLS handshake. Automatic renewal before certificate expiration was also Citadel’s responsibility.
Galley — Configuration Validation and Distribution
“A middle layer that validates and normalizes user-written Istio configurations (VirtualService, DestinationRule, etc.) and distributes them to other components.”
It served as a preprocessor that checked configuration validity and converted it to internal formats. Galley was meant to abstract away the need for other components to directly query the Kubernetes API.
Why They Were Merged → istiod
Problems that arose from running these three separately:
- Operational complexity — Three separate Deployments to deploy, monitor, and scale
- Inter-component communication — Network calls between them increased failure points
- Resource overhead — Each ran as a separate process consuming memory and CPU
- Galley’s diminishing value — In practice, having Pilot directly watch the Kubernetes API was more efficient, and Galley’s abstraction layer only added complexity
Starting with Istio 1.5, these three functions were consolidated into a single binary, istiod:
istiod = Pilot (traffic configuration distribution)
       + Citadel (certificate issuance/renewal)
       + Galley (configuration validation)
Same functionality, running in a single process. The “d” in istiod follows the Unix daemon naming convention (like sshd, httpd).

Before (Istio < 1.5):
- Three separate Deployments to manage
- Network calls required between components
- Galley added unnecessary complexity
After (Istio >= 1.5):
- Single Deployment for simplified operations
- In-process calls eliminate network overhead
- Reduced resource usage
The Relationship Between Envoy and Istio
We’ve been using Envoy and istio-proxy interchangeably, so let’s clarify their relationship.
Envoy Is an Independent Project
Envoy is not part of Istio. It was originally created at Lyft as an independent open-source proxy and is currently a CNCF graduated project. It existed before Istio and can be used standalone without Istio.
What Envoy can do on its own:
- L7 protocol awareness (HTTP/1.1, HTTP/2, gRPC, TCP, MongoDB, Redis, etc.)
- Load balancing (Round Robin, Least Request, Ring Hash, etc.)
- Circuit breakers, retries, timeouts
- TLS termination / origination
- Observability (metrics, tracing, access logs)
- Dynamic configuration changes (via xDS API without restarts)
The last point is crucial — Envoy provides an API interface called xDS that allows configuration to be dynamically injected from the outside.
What Does Istio Do?
Envoy is powerful on its own, but the question is who manages dozens or hundreds of Envoys. With 100 Pods, there are 100 Envoys, and each one needs to be notified of configuration changes. Istio is the Control Plane that solves this management problem.
Analogy:
- Envoy = A traffic officer standing at each intersection. Has the ability to directly control vehicles (packets).
- Istio (istiod) = A central traffic control center. Sends real-time instructions to all traffic officers.
istio-proxy = Envoy + extras
The istio-proxy container you see in kubectl describe pod is the Envoy binary + bootstrap logic added by Istio.
What runs inside the istio-proxy container:

1. pilot-agent (wrapper created by Istio)
   ├── Starts and manages the Envoy process
   ├── Fetches initial bootstrap config from istiod
   ├── Handles certificate renewal
   ├── Envoy health checks
   └── Restarts Envoy if it dies

2. Envoy (the actual proxy engine)
   ├── Starts with bootstrap config provided by pilot-agent
   ├── Establishes xDS gRPC connection to istiod for config
   └── Handles actual traffic (routing, mTLS, metrics, etc.)
The actual traffic-processing engine inside the istio-proxy container is Envoy. Istio simply wraps it with pilot-agent for lifecycle management and istiod integration.
The Significance of the xDS Standard Interface
Thanks to this separation:
- Envoy can work with multiple Control Planes beyond Istio. AWS App Mesh, Consul Connect, Gloo Edge, and others use Envoy as their data plane while providing their own Control Plane.
- Istio can use proxies other than Envoy as its data plane. Ambient Mesh’s ztunnel is this case — it’s not Envoy but a purpose-built L4 proxy written in Rust that receives configuration through istiod’s xDS.
istiod (Control Plane)
   │
   │ xDS API (standard interface)
   │
   ├──▶ Envoy (sidecar / waypoint)  — Full L7 capabilities
   │
   └──▶ ztunnel (Rust, node-level)    — L4 specialized, lightweight

xDS Protocol Deep Dive
Earlier we said istiod delivers configuration to Envoy — the specific protocol for that “delivery” is xDS.
xDS Components
xDS stands for “x Discovery Service,” where x is replaced by different letters, each responsible for a different type of configuration:
| xDS | Name | Role |
|---|---|---|
| LDS | Listener Discovery Service | Which ports to receive traffic on |
| RDS | Route Discovery Service | How to route received traffic |
| CDS | Cluster Discovery Service | What the routing targets (upstream groups) are |
| EDS | Endpoint Discovery Service | The actual Pod IP:Port for each upstream group |
| SDS | Secret Discovery Service | Certificates and keys for mTLS |
When these five are combined, Envoy has everything it needs to process traffic.

Concrete Example: Canary Deployment
A configuration that sends 90% of traffic to reviews v1 and 10% to v2:
# Istio CRD written by the user
apiVersion: networking.istio.io/v1beta1
kind: VirtualService
metadata:
  name: reviews-route
spec:
  hosts:
  - reviews
  http:
  - route:
    - destination:
        host: reviews
        subset: v1
      weight: 90
    - destination:
        host: reviews
        subset: v2
      weight: 10
---
apiVersion: networking.istio.io/v1beta1
kind: DestinationRule
metadata:
  name: reviews-dest
spec:
  host: reviews
  subsets:
  - name: v1
    labels:
      version: v1
  - name: v2
    labels:
      version: v2
When istiod converts this to xDS:
[LDS] Listener configuration
  "Listen for outbound traffic on 0.0.0.0:15001"
  "If Host header is 'reviews' → use Route Config 'reviews-route'"
         │
         ▼
[RDS] Route configuration
  "reviews-route:"
  "  90% → Cluster 'reviews.default.svc.cluster.local|v1'"
  "  10% → Cluster 'reviews.default.svc.cluster.local|v2'"
         │
         ▼
[CDS] Cluster configuration
  "reviews|v1: loadBalancing=RoundRobin, circuitBreaker=block after 3 5xx"
  "reviews|v2: loadBalancing=RoundRobin, circuitBreaker=block after 3 5xx"
         │
         ▼
[EDS] Endpoint configuration
  "reviews|v1 actual endpoints: [10.244.1.5:8080, 10.244.2.8:8080]"
  "reviews|v2 actual endpoints: [10.244.3.2:8080]"
         │
         ▼
[SDS] Secret configuration
  "This Envoy's certificate: <X.509 cert>, key: <private key>"
  "Trusted CA: <root cert>"
Real-Time Sync via gRPC Streaming
xDS uses bidirectional gRPC streams. The key point is that Envoy initiates the connection to istiod:

The approach of combining all xDS into a single gRPC stream is called ADS (Aggregated Discovery Service). Since receiving LDS/RDS/CDS/EDS separately could cause ordering issues (e.g., a Route referencing a Cluster that hasn’t arrived yet), everything is sent over a single stream with guaranteed ordering.
istiod Internal Processing Flow
[Kubernetes API Server]
     │
     │  Watch (Service, Endpoint, Pod, Istio CRDs)
     │
     ▼
[istiod: Config Controller]
     │
     │  "reviews Service's Endpoints have changed"
     │  "VirtualService 'reviews-route' was newly created"
     │
     ▼
[istiod: xDS Generator]
     │
     │  Changed resources → calculate affected Envoys
     │  → generate xDS config tailored to each Envoy
     │
     │  ★ Key point: it doesn't send the same config to all Envoys
     │    Based on each Envoy's location (which Pod, which namespace),
     │    it selects and sends only the relevant config
     │
     ▼
[istiod: xDS Server]
     │
     │  Push changed config through each Envoy's gRPC stream
     │
     ▼
[Each Envoy] ── Apply config (hot reload, no restart)
Full Flow When a VirtualService Changes
① kubectl apply -f virtualservice.yaml
     │
     ▼
② K8s API Server stores the VirtualService resource in etcd
     │
     ▼
③ istiod, which has been watching, receives the change event
     │
     ▼
④ istiod calculates which Envoys are affected by the VirtualService
     │
     ▼
⑤ Generates RDS (Route) config tailored to each Envoy
     │
     ▼
⑥ Pushes through the already-open gRPC streams to those Envoys
     │
     ▼
⑦ Envoy applies the new Route config via hot reload immediately
     │
     ▼
⑧ New routing rules take effect from the next request
     (existing connections are unaffected; applies to new connections)
This entire process happens without restarts, within seconds.
Useful Commands for Inspection
# Listener config for a specific Pod's Envoy (LDS)
istioctl proxy-config listeners <pod-name>

# Route config (RDS)
istioctl proxy-config routes <pod-name>

# Cluster config (CDS)
istioctl proxy-config clusters <pod-name>

# Endpoint config (EDS)
istioctl proxy-config endpoints <pod-name>

# Dump entire config as JSON
istioctl proxy-config all <pod-name> -o json
These commands connect to the Envoy admin API (port 15000) of the specified Pod and read the currently applied xDS configuration.
istiod Deployment and Operation
istiod Runs on Worker Nodes
istiod is a regular Deployment that runs on worker nodes. It does NOT run on master nodes (K8s Control Plane nodes). The term “Istio Control Plane” can be confusing, but it refers to Istio’s Control Plane, which is separate from the Kubernetes Control Plane (API Server, etcd, scheduler, etc.).
Kubernetes Cluster
├── Master Node (K8s Control Plane)
│   ├── kube-apiserver
│   ├── etcd
│   ├── kube-scheduler
│   └── kube-controller-manager
│
├── Worker Node 1
│   ├── kubelet
│   ├── istiod (Istio Control Plane) ← can be scheduled here
│   ├── Pod A + istio-proxy
│   └── Pod B + istio-proxy
│
├── Worker Node 2
│   ├── kubelet
│   ├── Pod C + istio-proxy
│   └── Pod D + istio-proxy
# istiod Deployment (simplified)
apiVersion: apps/v1
kind: Deployment
metadata:
  name: istiod
  namespace: istio-system
spec:
  replicas: 1          # 2-3 for HA in production
  template:
    spec:
      containers:
      - name: discovery
        image: istio/pilot:1.24.0
        ports:
        - containerPort: 15010  # xDS gRPC (plaintext)
        - containerPort: 15012  # xDS gRPC (mTLS)
        - containerPort: 443    # Webhook (sidecar injection)
        - containerPort: 15014  # Monitoring
The Kubernetes scheduler places it on any worker node based on resource availability. Since it’s exposed via a Service, all Envoys can reach it regardless of which node it’s on.
mTLS and Zero Trust
TLS vs mTLS
Regular TLS (HTTPS)
What happens when you browse to https://github.com:

The key characteristic of regular TLS: only the server proves its identity. The client doesn’t present a certificate.
mTLS (Mutual TLS)
The client also proves its identity with a certificate:

Mutual = both sides. Both sides ask each other “who are you?” and both answer with a certificate.
Why mTLS Is Needed in Kubernetes
In a regular Kubernetes cluster, Pod-to-Pod communication is plaintext by default. Why this is a problem:
- Anyone with access to a node’s network can capture packets and see everything
- When Pod A sends a request to Pod B, Pod B has no way to verify “did Pod A really send this?”
This is the core premise of Zero Trust — “don’t use network location (same cluster, same VLAN, etc.) as a basis for trust.” Instead, cryptographically verify the identity of the other party in every communication.
How mTLS Works in Istio
Step 1: Workload Identity — SPIFFE
Istio assigns each workload a unique identity called a SPIFFE ID (Secure Production Identity Framework for Everyone):
spiffe://cluster.local/ns/default/sa/reviews
         ───────────── ────────── ──────────
          trust domain  namespace  service account
This ID maps to a Kubernetes ServiceAccount. The SPIFFE ID is determined by which ServiceAccount the Pod runs as.
Step 2: Certificate Issuance Process

When Envoy starts up, it requests a certificate from istiod via an SDS request. istiod verifies the Pod’s ServiceAccount through the K8s API Server, then issues a signed X.509 certificate and private key.
Step 3: The Actual mTLS Handshake
Here’s what happens when Pod A (productpage) sends a request to Pod B (reviews):

The critical point is that the app is unaware of this entire flow. As we’ve consistently seen, all traffic processing is done by Envoy. mTLS is no exception.
Throughout this entire process, the app:
- Sends plaintext HTTP → Envoy encrypts it
- Receives plaintext HTTP → Envoy decrypts it
- Doesn’t need to manage certificates → Envoy + istiod handle it automatically
- Needs zero TLS-related logic in the code
mTLS + AuthorizationPolicy = Zero Trust
mTLS alone provides “encryption + mutual authentication.” Adding Istio’s AuthorizationPolicy on top enables control over “who can access whom”:
apiVersion: security.istio.io/v1
kind: AuthorizationPolicy
metadata:
  name: reviews-policy
  namespace: default
spec:
  selector:
    matchLabels:
      app: reviews
  rules:
  - from:
    - source:
        principals:
        - "cluster.local/ns/default/sa/productpage"  # only this SPIFFE ID
    to:
    - operation:
        methods: ["GET"]           # only GET
        paths: ["/api/reviews/*"]  # only this path
The essence of Zero Trust is making decisions based on cryptographically verified workload identity, not network IPs.
Traditional network security:
  "Allow traffic from the 10.244.1.0/24 range" ← IP-based, spoofable

Zero Trust (Istio mTLS):
  "Allow only if spiffe://cluster.local/ns/default/sa/productpage
   proves itself with a signed certificate" ← cryptographic verification
mTLS Modes
apiVersion: security.istio.io/v1
kind: PeerAuthentication
metadata:
  name: default
  namespace: istio-system   # applies mesh-wide
spec:
  mtls:
    mode: STRICT    # or PERMISSIVE
- PERMISSIVE — Accepts both mTLS and plaintext. Used when some services haven’t joined the mesh yet. Useful for gradual Istio adoption.
- STRICT — mTLS only. Rejects plaintext traffic without certificates. Full Zero Trust.
Istio + CNI Combinations (Cilium, Calico, Flannel)
So far we’ve seen how Istio intercepts traffic (iptables), routes it (xDS), and encrypts it (mTLS). But all of this rests on the premise that Pod-to-Pod networking already works. The thing that creates that “Pod-to-Pod network” is CNI. Since Istio runs on top of CNI, the choice of CNI affects Istio’s behavior and performance.
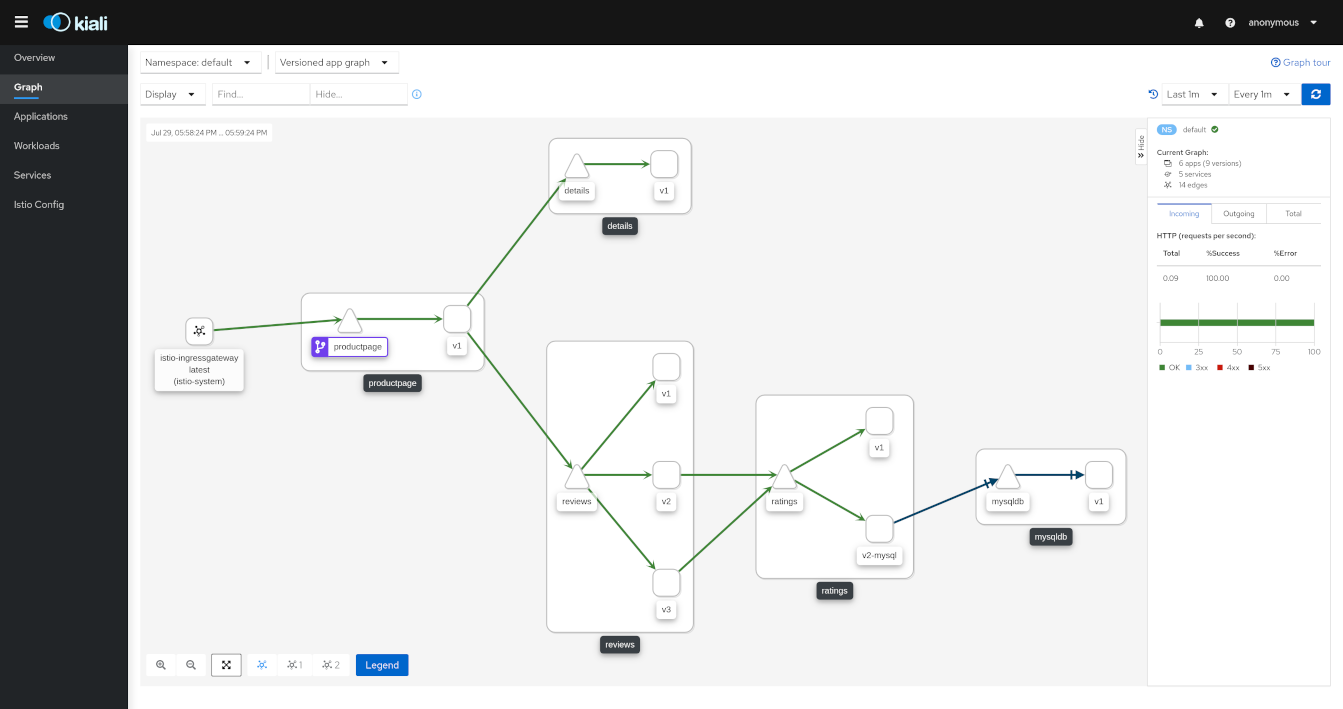 Source: https://pre-v1-41.kiali.io/documentation/v1.36/features/
With a service mesh in place, you can visualize inter-service traffic flows in real time as shown above. This dashboard is Kiali, a popular observability tool used alongside Istio.
CNI vs Service Mesh: Different Layers

CNI is “the base network infrastructure that gives Pods IPs and enables them to communicate with other Pods,” while Service Mesh is “the layer on top that provides fine-grained control over application-level traffic.”
Flannel + Istio
The simplest combination. Flannel only handles L3 overlay (VXLAN) and doesn’t even support NetworkPolicy, so there’s virtually no conflict with Istio. However, since Flannel does so little, all network policy is left to Istio’s AuthorizationPolicy. k3s uses Flannel as its default CNI, making this the easiest combination to start with.
Calico + Istio
Calico handles L3/L4 NetworkPolicy while Istio handles L7 policy, creating a layered security architecture. Combining Calico with Istio Ambient Mesh enables a defense-in-depth strategy where ztunnel encrypts all traffic and verifies identity, while Calico controls which connections are allowed at the CNI level.
Cilium + Istio
The recommended approach is to have Cilium handle kernel-level networking (IP management, routing, L3/L4 policy) while Istio handles the application layer (HTTP routing, mTLS identity, fine-grained authorization, traffic shaping). However, Cilium’s kubeProxyReplacement performs eBPF socket-level load balancing which can bypass Istio’s iptables REDIRECT, so the socketLB.hostNamespaceOnly: true setting is required.
Putting It All Together
Layer Structure
What users write:
  VirtualService, DestinationRule, AuthorizationPolicy (Istio CRDs)
          │
          ▼
What istiod does:
  K8s resources + Istio CRDs → convert to xDS config → push to each Envoy via gRPC
  + Certificate issuance/renewal (CA)
  + Automatic sidecar injection via Mutating Webhook
          │
          ▼
What Envoy (istio-proxy) does:
  Process actual traffic according to xDS config
  - Routing, load balancing, retries
  - mTLS handshake
  - Metrics collection, tracing header propagation
  - Authorization policy enforcement
          │
          ▼
What iptables (or eBPF) does:
  Transparent traffic redirect between app ↔ Envoy
  (the app thinks it's communicating directly)
Dependency Summary
netfilter (kernel)
  └── REDIRECT traffic to Envoy via iptables rules
        └── Envoy (istio-proxy)
              ├── Apply routing rules received from istiod via xDS
              ├── Perform mTLS with certificates received from istiod via SDS
              ├── Mutual authentication based on SPIFFE ID
              └── L7 authorization via AuthorizationPolicy
                    └── istiod (Control Plane)
                          ├── Watch K8s API → generate/distribute xDS config
                          ├── Issue/renew certificates as CA
                          └── Auto-inject sidecars via Webhook
In summary: “netfilter in the kernel intercepts traffic → Envoy processes it → istiod manages it” — a three-layer architecture where mTLS is the encryption/authentication mechanism performed at the Envoy layer, with istiod automatically managing the certificate lifecycle.

Conclusion
Ultimately, Istio is a three-layer architecture: “netfilter in the kernel intercepts traffic → Envoy processes it → istiod manages it.” The reason you get mTLS, traffic routing, and observability without changing a single line of application code is that these layers operate transparently. If you have foundational knowledge of netfilter, iptables, and CNI from the previous posts, Istio’s inner workings should feel much more intuitive.